Depth Map Generator
Make a depth map from any photo, in your browser, ready for laser engraving, CNC relief, Blender or ControlNet.
Make a depth map from a photo
Add a picture and get its depth map. An AI model works it out on your own device, in your browser. Your picture is not uploaded.
Riders at Yosemite Falls, 1901.
The first time, your browser downloads the depth model (27 to 50 MB) and keeps it for next time.
Your depth map appears here.
For video, and for higher-quality depth and 3D, there is the Owl3D converter, a desktop app.
How to use it
- Add a photo. Press "Choose picture" and pick a JPEG, PNG or WebP (HEIC works where your browser can open it). On a phone this opens your photo library. No photo to hand? Press "Load an example".
- Wait for the depth. The first time, your browser downloads the depth model (about 27 MB, or 50 MB on WebGPU). It keeps it, so the next photo starts at once. The map appears beside your photo.
- Set it up for your software. Choose whether near is white or black (which one?), 8-bit or 16-bit PNG, and the output size. Adjust the levels if you need more contrast.
- Check it in 3D and download. Switch "Show" to "3D preview" and move the pointer over it, or tilt your phone, to see that the depth is right. Then press "Download depth map".
What this depth map generator does
A depth map is a grey picture of how far away each part of a photo is. In this tool's default, near things are white and far things are black.
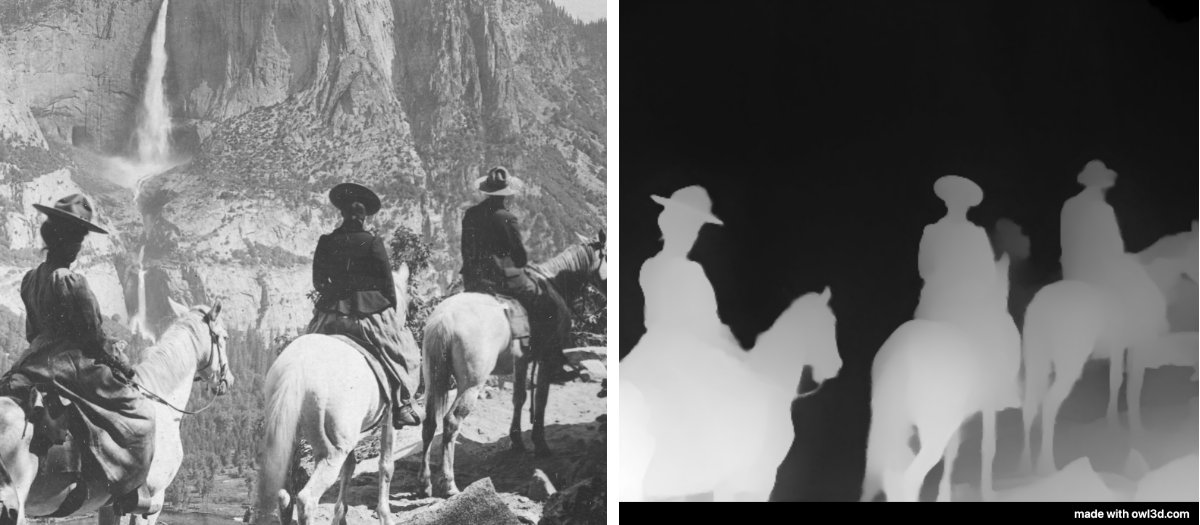
A depth map is not a greyscale photo. A greyscale photo shows how bright things are, so a dark beard or a shadow would come out as a hole. A depth map shows how near things are, whatever their colour. That is why carving or engraving a plain greyscale photo gives odd results, and why you need a map like this.
An AI model estimates that depth from your one photo. It is Depth Anything V2 Small, published by Lihe Yang and colleagues in 2024 under the Apache-2.0 licence [1]. It runs in your browser with ONNX Runtime Web: on the graphics chip (WebGPU) where your browser supports it, otherwise on the processor, which is slower.
The map is relative depth: which things are nearer than others, and the shape of surfaces. It is not a distance in metres. Depth Anything V2's makers describe the model this way, and publish separate versions for metric depth [1]. For an engraving, a relief, a displacement or ControlNet, relative depth is what you need: you set the real depth in millimetres, or the strength, in the software that reads the map.
The mark. The "made with owl3d.com" mark goes in a thin strip added below the map, never on the map itself, so every depth value stays clean.
The options, explained
| Option | Choices | When to change it |
|---|---|---|
| Near is | White (default) or black | Some engraving software and some apps want near as black |
| Format | 8-bit PNG or 16-bit PNG | 16-bit for Blender displacement, relief and CNC; 8-bit for ControlNet and most apps |
| Size | The photo's own size (up to 4,096 px on the long side) or the model's size | The model's size is smaller and quicker to share; use the photo's size to line up with the original |
| Levels | Black point, white point, mid-tones | Stretch the grey range over the part of the scene you care about |
| Smoothing | Off, light (default) or strong; edge-preserving | Strong if the map looks grainy on flat surfaces; off for the raw model output. Edges stay sharp |
8-bit or 16-bit. An 8-bit grey PNG has 256 shades; a 16-bit one has 65,536 [2]. With only 256 steps, a smooth slope turned into a surface by displacement or a CNC router can show visible steps (terraces). The 16-bit file here is a true 16-bit greyscale PNG, not 8-bit values stored in a 16-bit file, and the map spreads over the whole range from black to white. Most image apps and ControlNet expect 8-bit, so keep that unless your software takes 16-bit.
Levels. Moving the black point up and the white point down spends all the grey shades on the depth range you set, which gives more contrast. "Mid-tones" brings out depth in the near part of the scene or the far part, without changing the end points.
Frequently asked questions
Is white high or low? Near as white or near as black?
It depends on the software reading the map. In LightBurn's 3D Sliced mode, lighter pixels get fewer passes than darker ones, down to no passes for pure white, so darker areas are engraved deeper [5]: with near as white, near things stay raised, as on a coin. Its "Negative Image" setting reverses that, so lighter areas are engraved deeper [5]; that is the setting people use for a die or a mould. ControlNet's depth model was trained on maps where white is near ("shallow") and black is far ("deep") [3]. In Blender's Displace modifier, values lighter than "Midlevel" push the surface outward and darker ones push it in [4], so near-is-white makes near things stand out. If your software wants the opposite, choose near is black. When unsure, try a small test piece first.
Can I use it for laser engraving or CNC relief?
Yes. Engraving and relief software reads a depth map as a height map: each shade becomes a height or an engraving depth. Download a 16-bit PNG where your software accepts it, at the photo's size, and crop off the strip at the bottom first (see below), or it will be engraved too. Choose light smoothing or strong smoothing if flat surfaces look grainy.
Why is my engraving flat, or full of steps?
A flat result usually means the map uses only part of the grey range, so the software has few depths to work with: stretch it with the black and white points under "Levels". Steps come from too few grey levels or too few passes: use the 16-bit file and more passes, or more layers in your relief software.
Why is there a strip at the bottom of my depth map?
That is the "made with owl3d.com" mark. We put it in its own strip below the map so that it never changes a depth value. If your software needs the map to be exactly the photo's size, for example to line it up with the photo in Blender or After Effects, crop the strip off: cut the picture back to the photo's height and nothing of the map is lost.
How do I use a depth map in Blender?
Download a 16-bit PNG at the photo's size. Add a subdivided plane, add a Displace modifier, and give it the map as an image texture. The modifier moves each vertex by the brightness of the texture; "Strength" sets how far, and "Midlevel" sets which grey counts as no movement [4]. Put the photo on the same plane as its colour texture to get a 3D photo.
Will it work with ControlNet in ComfyUI or Automatic1111?
Yes. Choose near is white and 8-bit PNG, and load the map as the control image with the depth preprocessor set to none, since the map is already made. ControlNet's depth model was trained on grey depth maps from several estimators [3][6].
Is it the distance in metres?
No. The map shows the order of depth and the shape of things, not measured distances. Two photos of the same scene can come out with different grey values for the same distance.
Why does the depth look wrong on glass, mirrors or the sky?
The model guesses depth from what the picture looks like, so things that look unlike their real depth confuse it: reflections, windows, flat pictures of scenes, fog. The sky is treated as the farthest part. Fix small errors by painting on the map in an image editor.
Are my photos uploaded?
No. The model runs in your browser, on your device. The only download is the model itself, once.
For video, or a 3D picture instead of a map
If what you want in the end is a 3D picture or 3D video, not a depth map, the Owl3D converter is a desktop app for Windows and Mac that turns 2D photos and videos into stereoscopic 3D with AI, on your own computer. It saves side-by-side, half side-by-side, top-bottom, and Spatial Video for Apple Vision Pro (on a Mac). It does not save depth maps. As with any AI conversion, the depth is the software's estimate, not a second camera.
Learn more
To turn one photo into a 3D picture: Wigglegram Maker or Anaglyph Maker. How 3D photos work: Stereoscopic 3D.