📥 Download the Owl3D software
Visit www.owl3d.com on your PC to download the latest Owl3D software.
Owl3D SHIFT — 14" Glasses-Free 3D Display · User manual
Model S1G1000-C1 · For the latest version of this manual and software downloads, visit owl3d.com/shift
Thank you for choosing Owl3D
As a pioneer in glasses-free 3D display technology, Owl3D is dedicated to bringing immersive three-dimensional visualization directly to your desktop — without special eyewear.
The Owl3D Shift is a real-time 3D portal that transforms any on-screen content into a depth-rich experience : films, websites, photos, games, and more — all rendered live in stunning glasses-free 3D.
We are confident the Owl3D Shift will serve you well. Once again, thank you for choosing Owl3D!
❗ IMPORTANT — Please read this User Manual before using your Owl3D Shift to ensure safe installation and operation. For the latest version of this manual and software downloads, visit owl3d.com/shift.
Contents
Health and Safety
What's in the box
Let's set it up
Connect everything
See it in 3D
Specifications
Something not right?
Keeping it clean
Regulatory and service information
1. Health and Safety
Read these instructions completely before connecting or using the Owl3D Shift.
Keep this manual in a safe place and heed all warnings.
1.1 Read this first
⚠️ WARNING — Use of controls, adjustments, or procedures other than those specified in this documentation may result in electric shock, electrical hazards, and/or mechanical hazards.
- Read these instructions completely before connecting or using the Owl3D Shift.
- Keep this manual in a safe place for future reference.
- Heed all warnings and follow all instructions.
- Sit at least 18" / 45 cm from the display during normal viewing.
- Always handle the display with care when moving it.
- Never remove the screen glass, rear cover or system cover. This product contains high-voltage components. Internal servicing must be performed by qualified service personnel only.
- Do not use near water or in damp locations. Do not expose to rain or moisture.
- Do not place near heat sources such as radiators, stoves, or other heat-generating equipment.
- Do not place heavy objects on the display, power cable, or signal cables.
- If smoke, abnormal noise, or an unusual odor is detected, unplug the power cable immediately and contact your dealer or Owl3D. Continued use is dangerous.
- Do not block the ventilation openings on the enclosure.
- Unplug the display when unused for extended periods.
- Refer all servicing to qualified service personnel.
1.2 Safe use and care
Operation
- Place the display in a well-ventilated area. Do not place objects on top that block heat dissipation.
- Do not knock or drop the display during operation or transport.
- Do not place the display on an unstable surface.
- Excessive display use may cause eye discomfort. Take short, frequent breaks — a 5–10 minute break every 50–60 minutes is recommended.
Maintenance
- Do not press excessively on the LCD panel. Grasp the frame when moving the display.
- Unplug the display before cleaning.
- Clean with a soft, slightly damp cloth. Do not use alcohol, ammonia-based liquids, or organic solvents.
- Do not expose to dust, rain, water, or excessive moisture.
- If the display becomes wet, wipe dry immediately with a soft cloth.
- Operating temperature: 0–40°C (32–104°F); Humidity: 20–80% RH.
1.3 About this manual
The following icons are used throughout this manual:
- NOTE : Indicates important information and tips.
- CAUTION : Indicates information to help avoid potential hardware damage or data loss.
- WARNING : Indicates the potential for bodily harm and how to avoid it.
1.4 Disposal
This marking indicates that this product may not be disposed of with regular household waste under Directive 2012/19/EU (WEEE). Dispose of this equipment through a designated waste electrical and electronic equipment collection. Contact your local government, waste disposal organization, or the store where you purchased the product for drop-off locations. Your display is manufactured with high-quality materials that can be recycled and reused. For more information, visit owl3d.ai.
2. What's in the box
Please verify that all items below are present before proceeding. If any item is missing or damaged, please contact us.
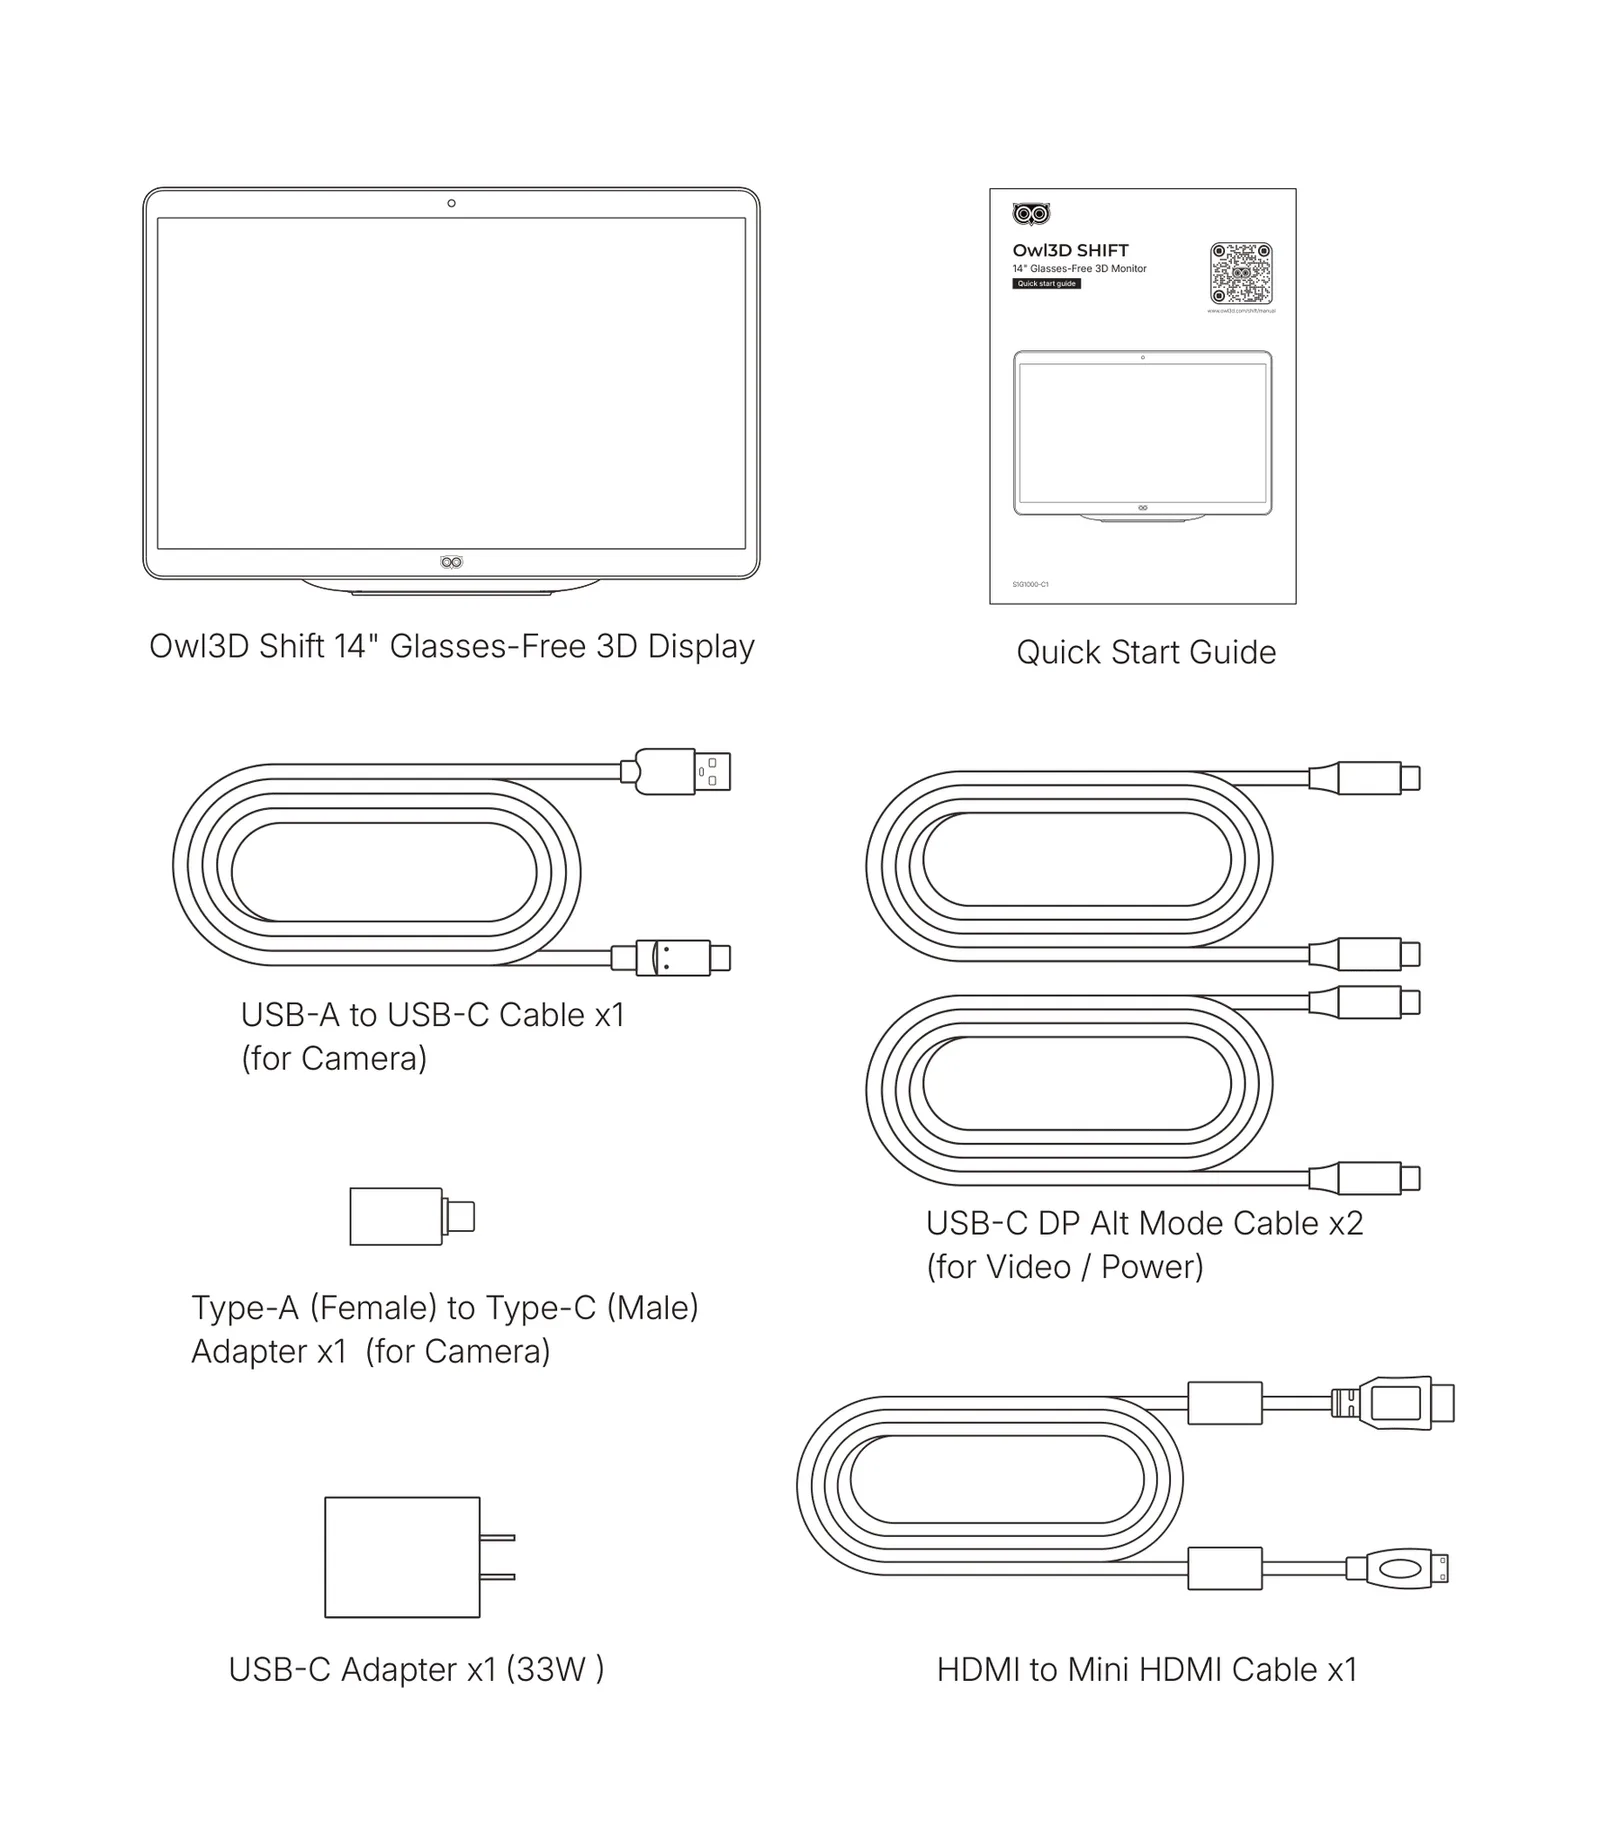
📝 NOTE — Included accessories may vary by region.
2.1 Meet your Owl3D Shift
Front view
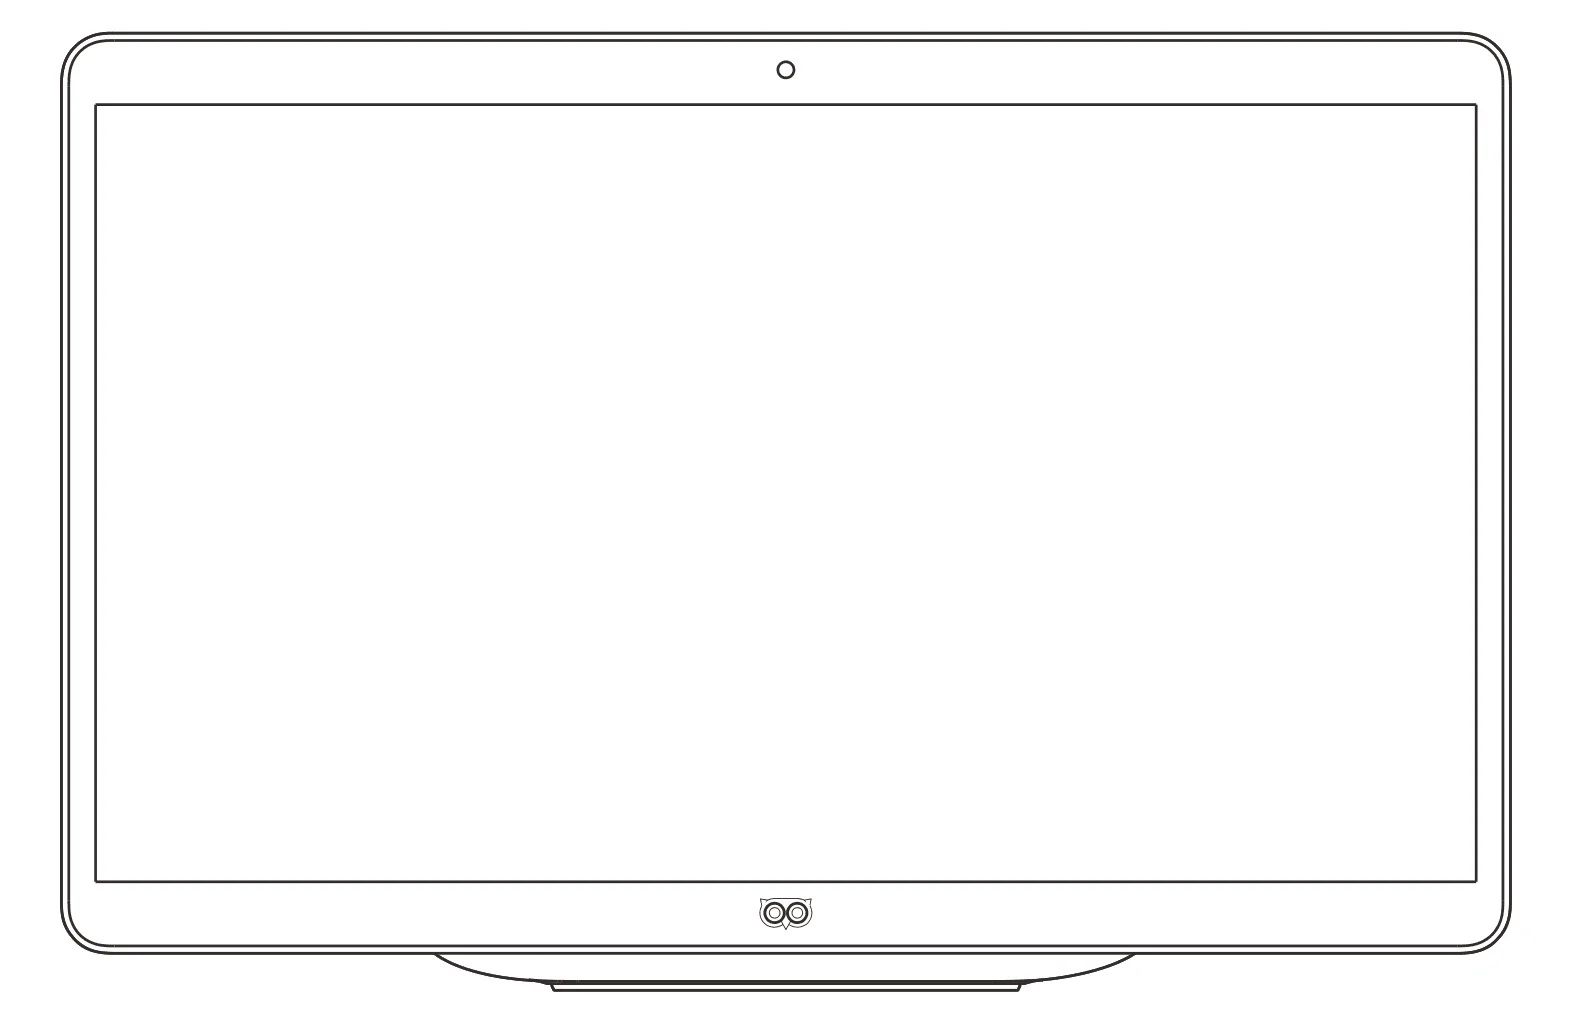
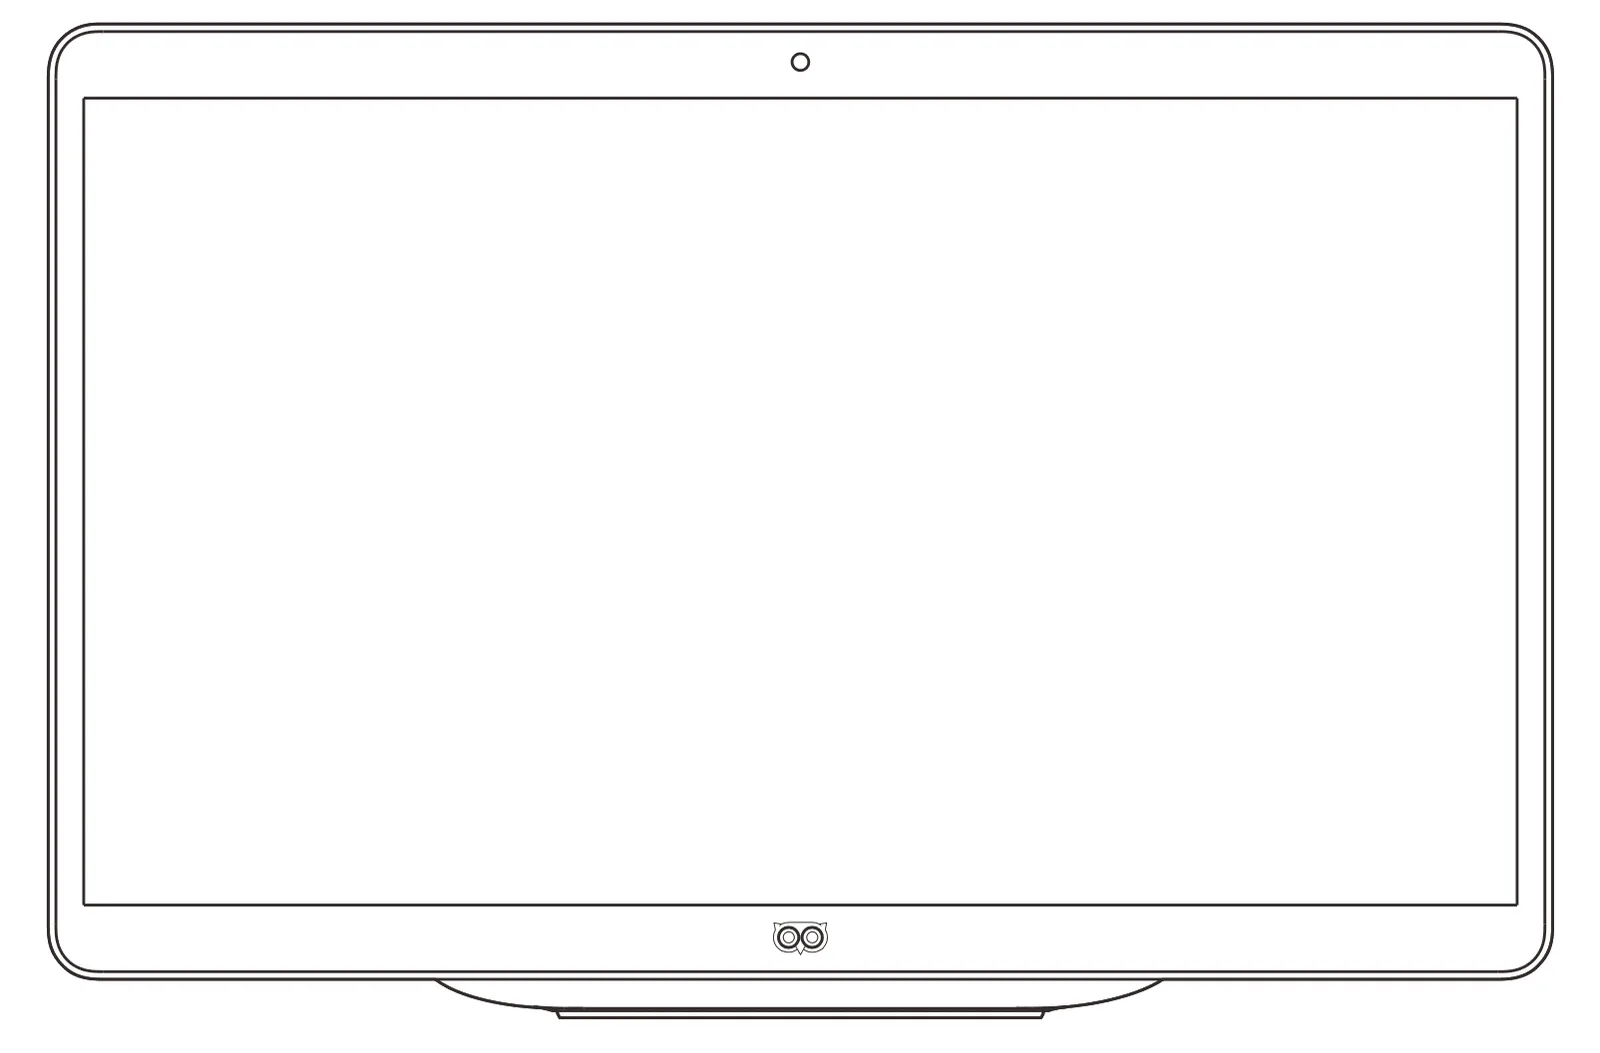
The Owl3D Shift features a 14-inch 4K glasses-free 3D display panel with a built-in proprietary cylindrical lenticular lens array. The integrated eye-tracking camera is positioned at the top center of the display bezel. It continuously monitors your eye position in real time, enabling the Owl3D Shift software to dynamically adjust the rendered 3D imagery for a consistent depth effect as you move naturally within the viewing zone.
Rear view
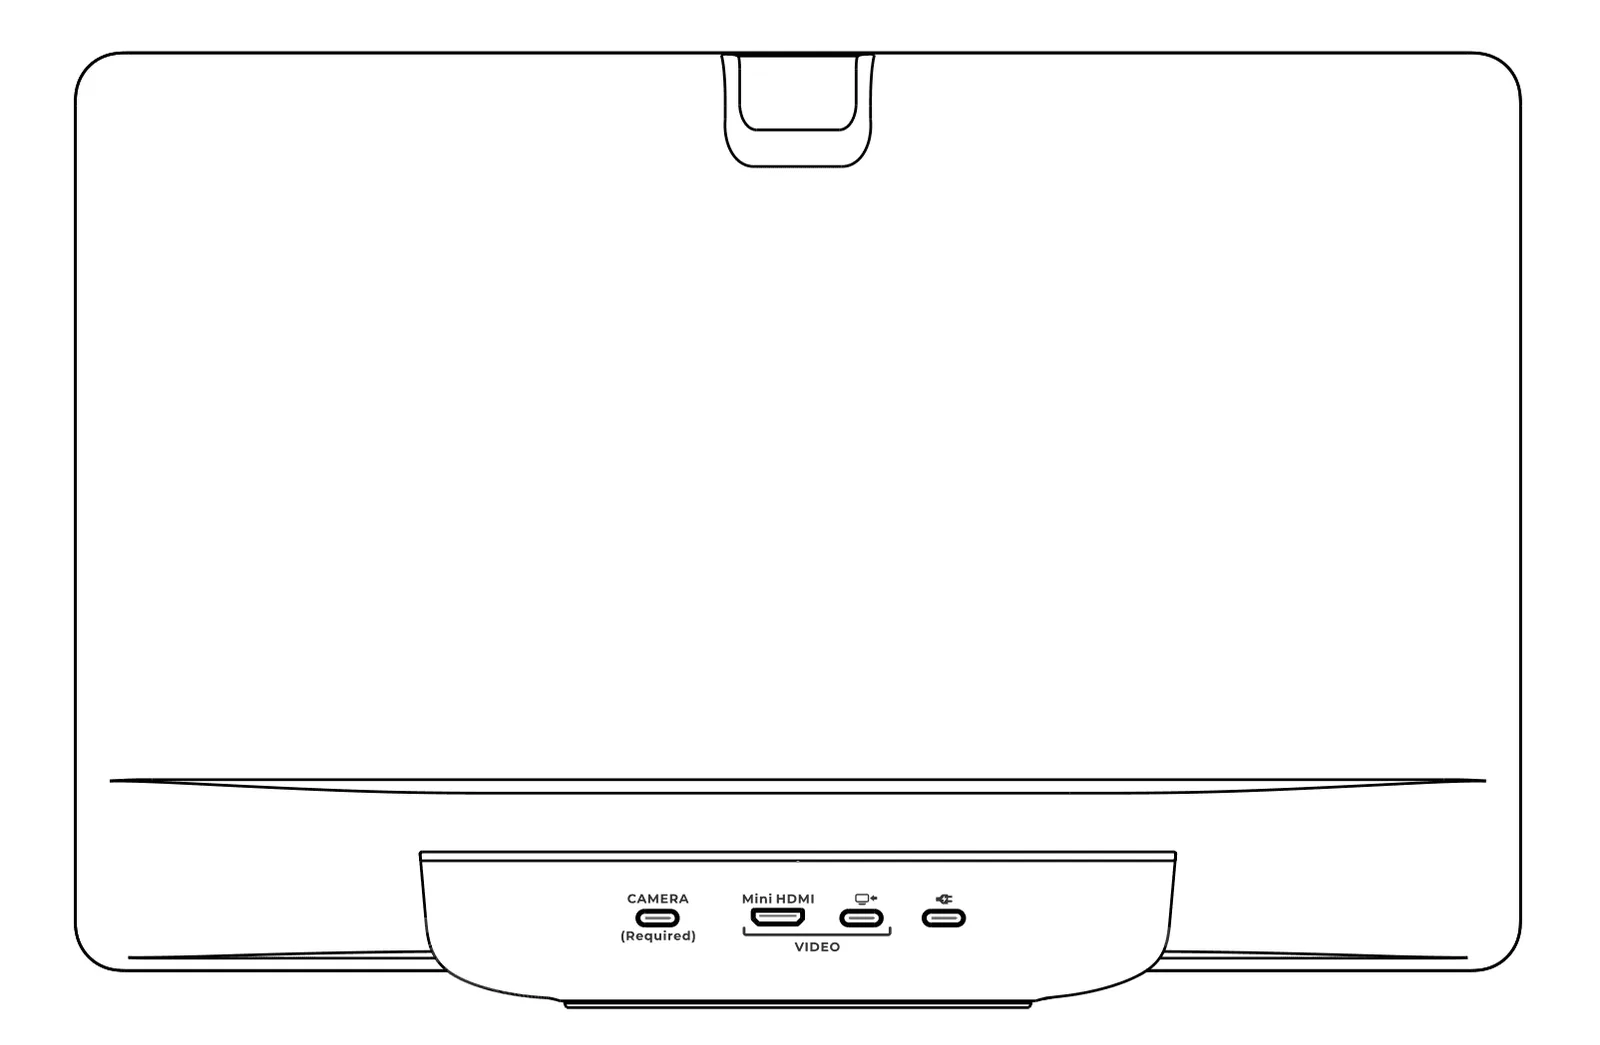
The rear panel houses all I/O ports. All cable connections are made from the rear.
System / IO ports
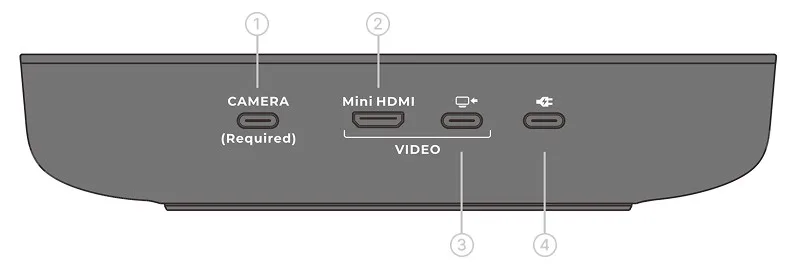
| Port | Description | |
|---|---|---|
| 1 | Camera (USB-C) | Eye-tracking camera connection. Connect to PC via the included USB-A to USB-C Cable (use the included adapter for USB-C ports on the PC). |
| 2 | Mini HDMI | Video signal input via HDMI. Connect to your PC's HDMI output using the included HDMI to Mini HDMI Cable. |
| 3 | USB-C (DP Alt Mode) | Video signal input via USB-C DisplayPort Alt Mode. Connect to a USB-C DP-capable port on your PC using the included USB-C DP Alt Mode Cable. |
| 4 | USB-C (Power) | Power input. Connect to the included USB-C Adapter (wall outlet), or to a USB-C port on your PC capable of supplying 20 W or more. |
Top view
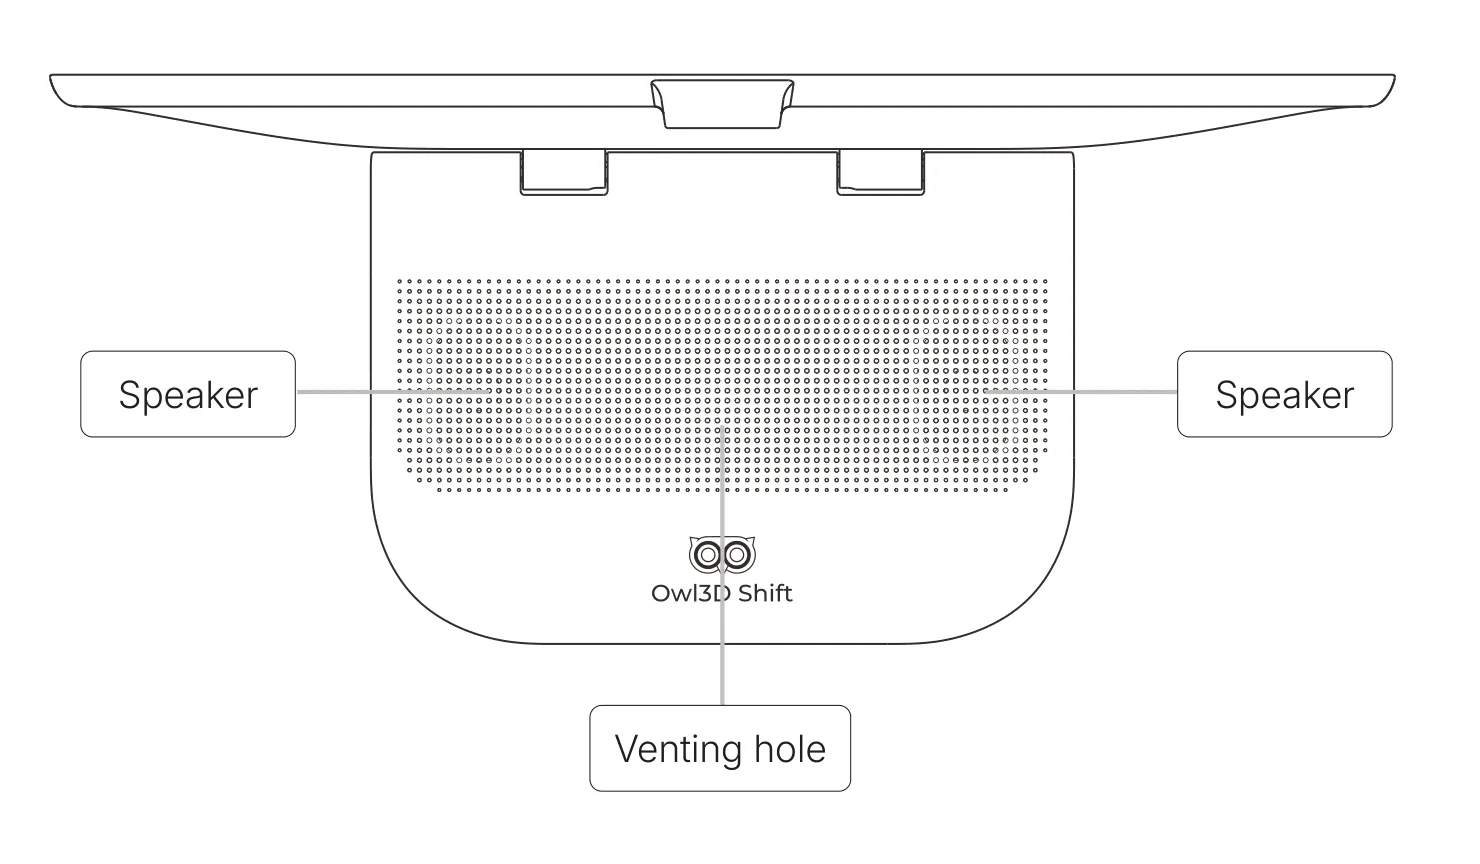
Bottom view
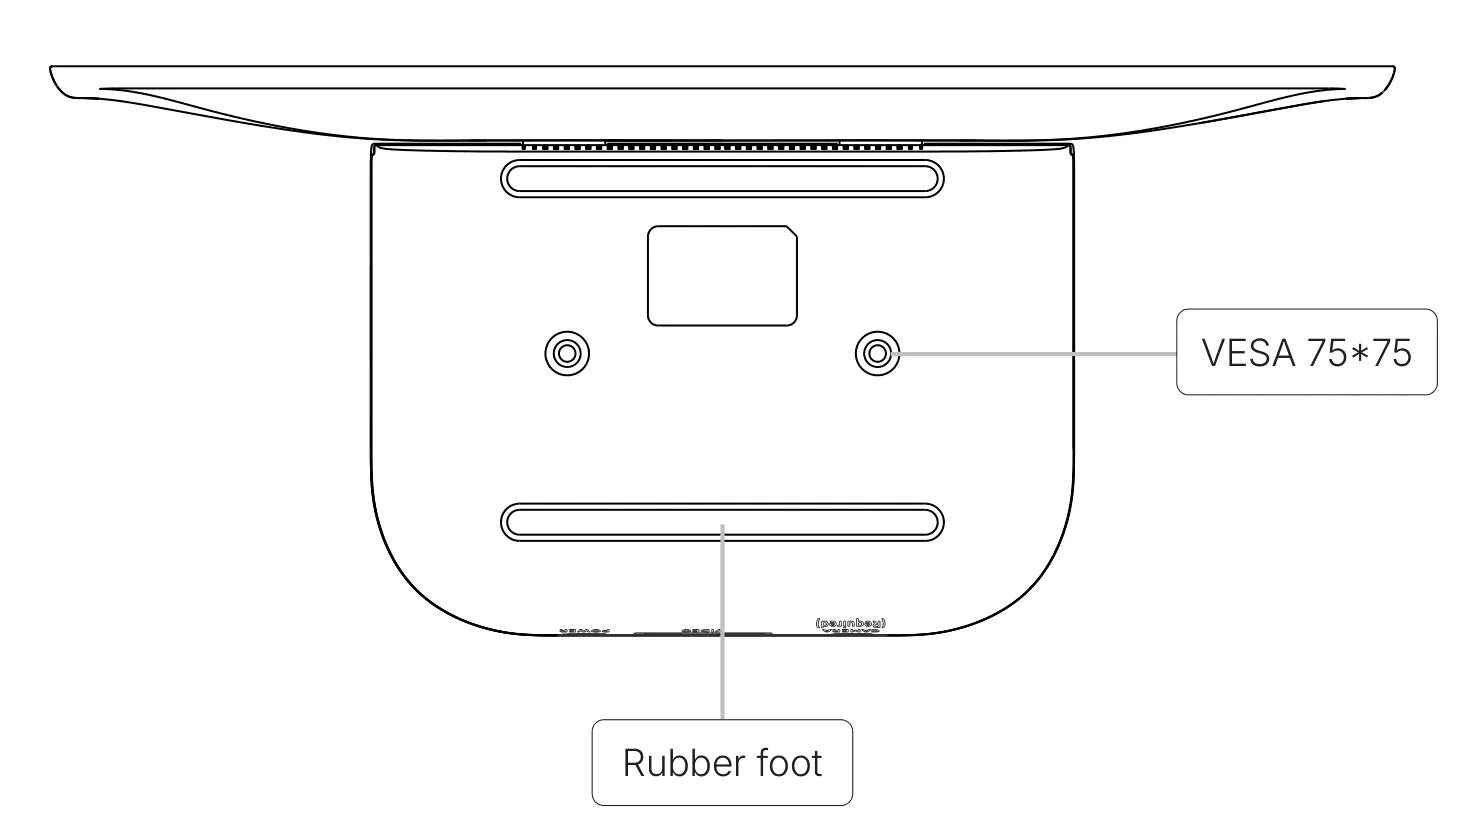
3. Let's set it up
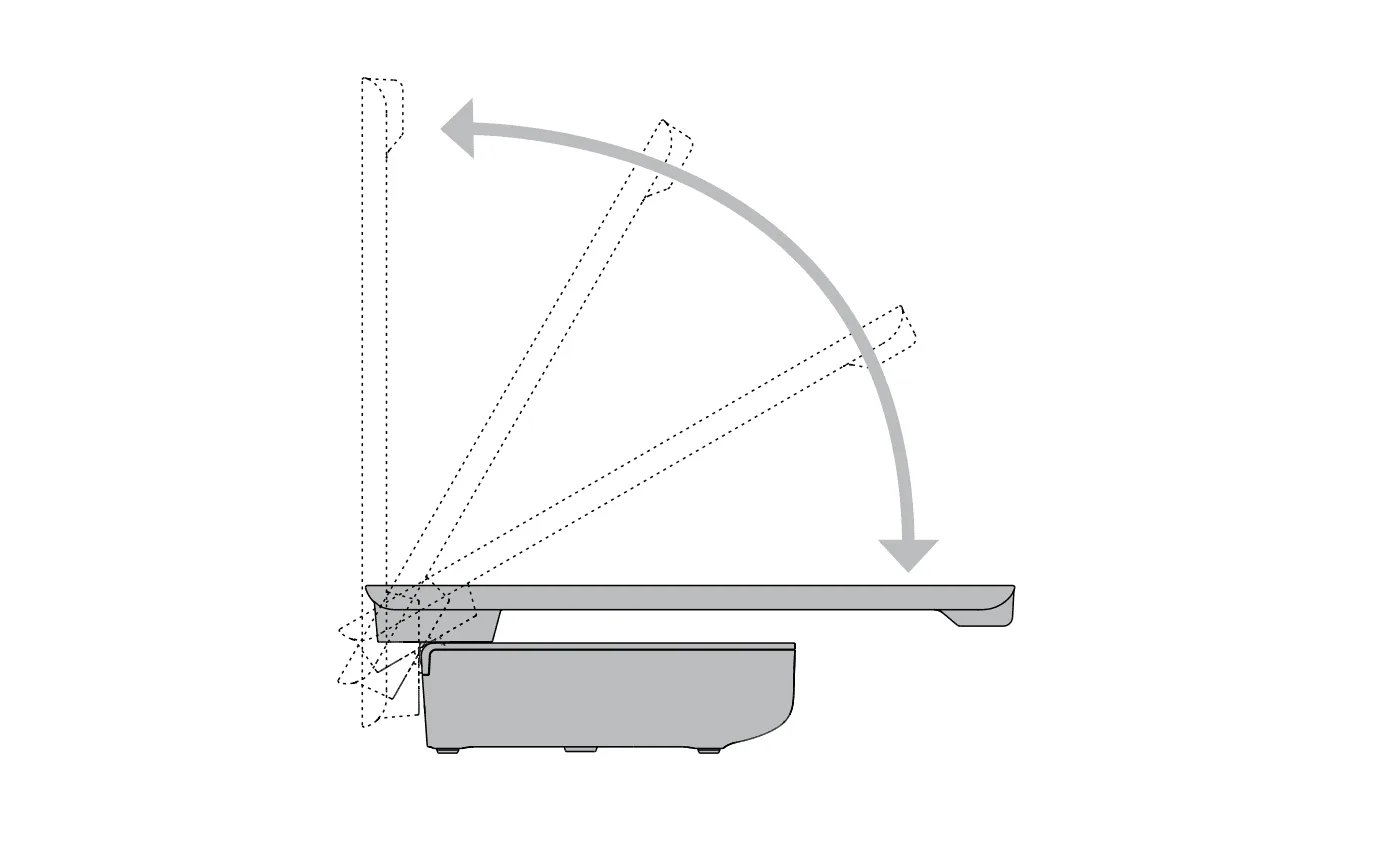
3.1 Adjust the angle
The Owl3D Shift ships flat (face-up) for transit protection. Raise it to your preferred angle, keeping your line of sight perpendicular to the screen for the best 3D effect.
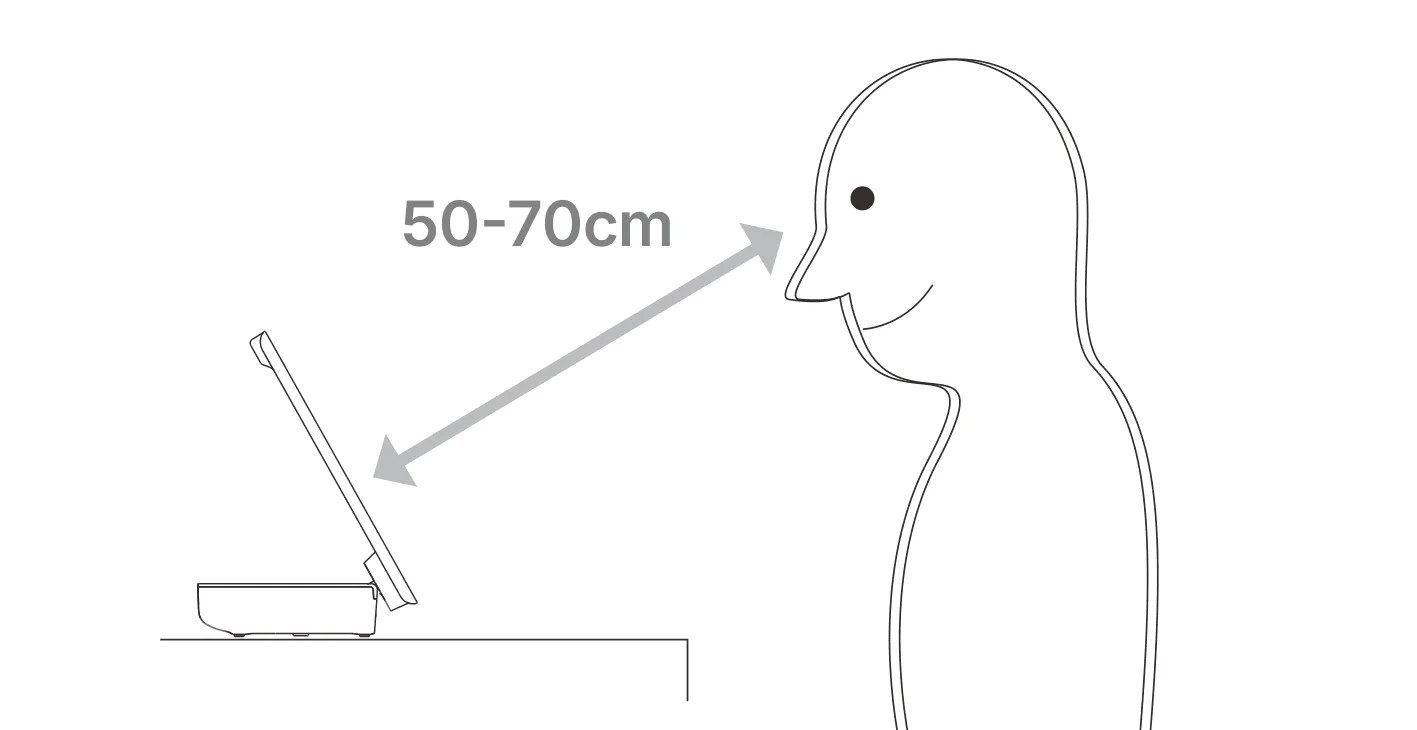
3.2 Find the right spot
Maintain a viewing distance of 50–70 cm from the display. Staying within this range helps ensure accurate 3D depth perception and a comfortable viewing experience.
3.3 Mount it your way
VESA Mounting (Optional): The rear panel features a standard VESA 75×75 mm mounting pattern. Attach a compatible monitor arm or wall-mount bracket to the two M4 mounting points. When using a VESA mount, ensure the display remains at a comfortable viewing height and angle, and that the camera has a clear line of sight to your eyes.
Confirm M4 screws are tightened to the mount manufacturer's specifications. Ensure the mount arm's weight rating is sufficient for the Owl3D Shift. Check that all mount joints are properly secured. The VESA hole depth is only 5 mm. Please use M4×6 mm short screws or the spacers included with your mount arm.
When adjusting the angle of your Shift on a monitor arm, always grip the base of the display — the part that attaches directly to the arm — rather than the screen panel itself. Grabbing the screen can put unnecessary stress on the panel and mounting points.
⚠️ NOTE — Do not over-tighten the M4 mounting screws, as this may damage the rear panel. Use only screws of the length specified by your mount manufacturer. Owl3D is not responsible for damage caused by third-party mounting accessories.
4. Connect everything
Connect all cables to the rear panel before powering on. Your PC or laptop must have a dedicated NVIDIA GPU for 3D operation.
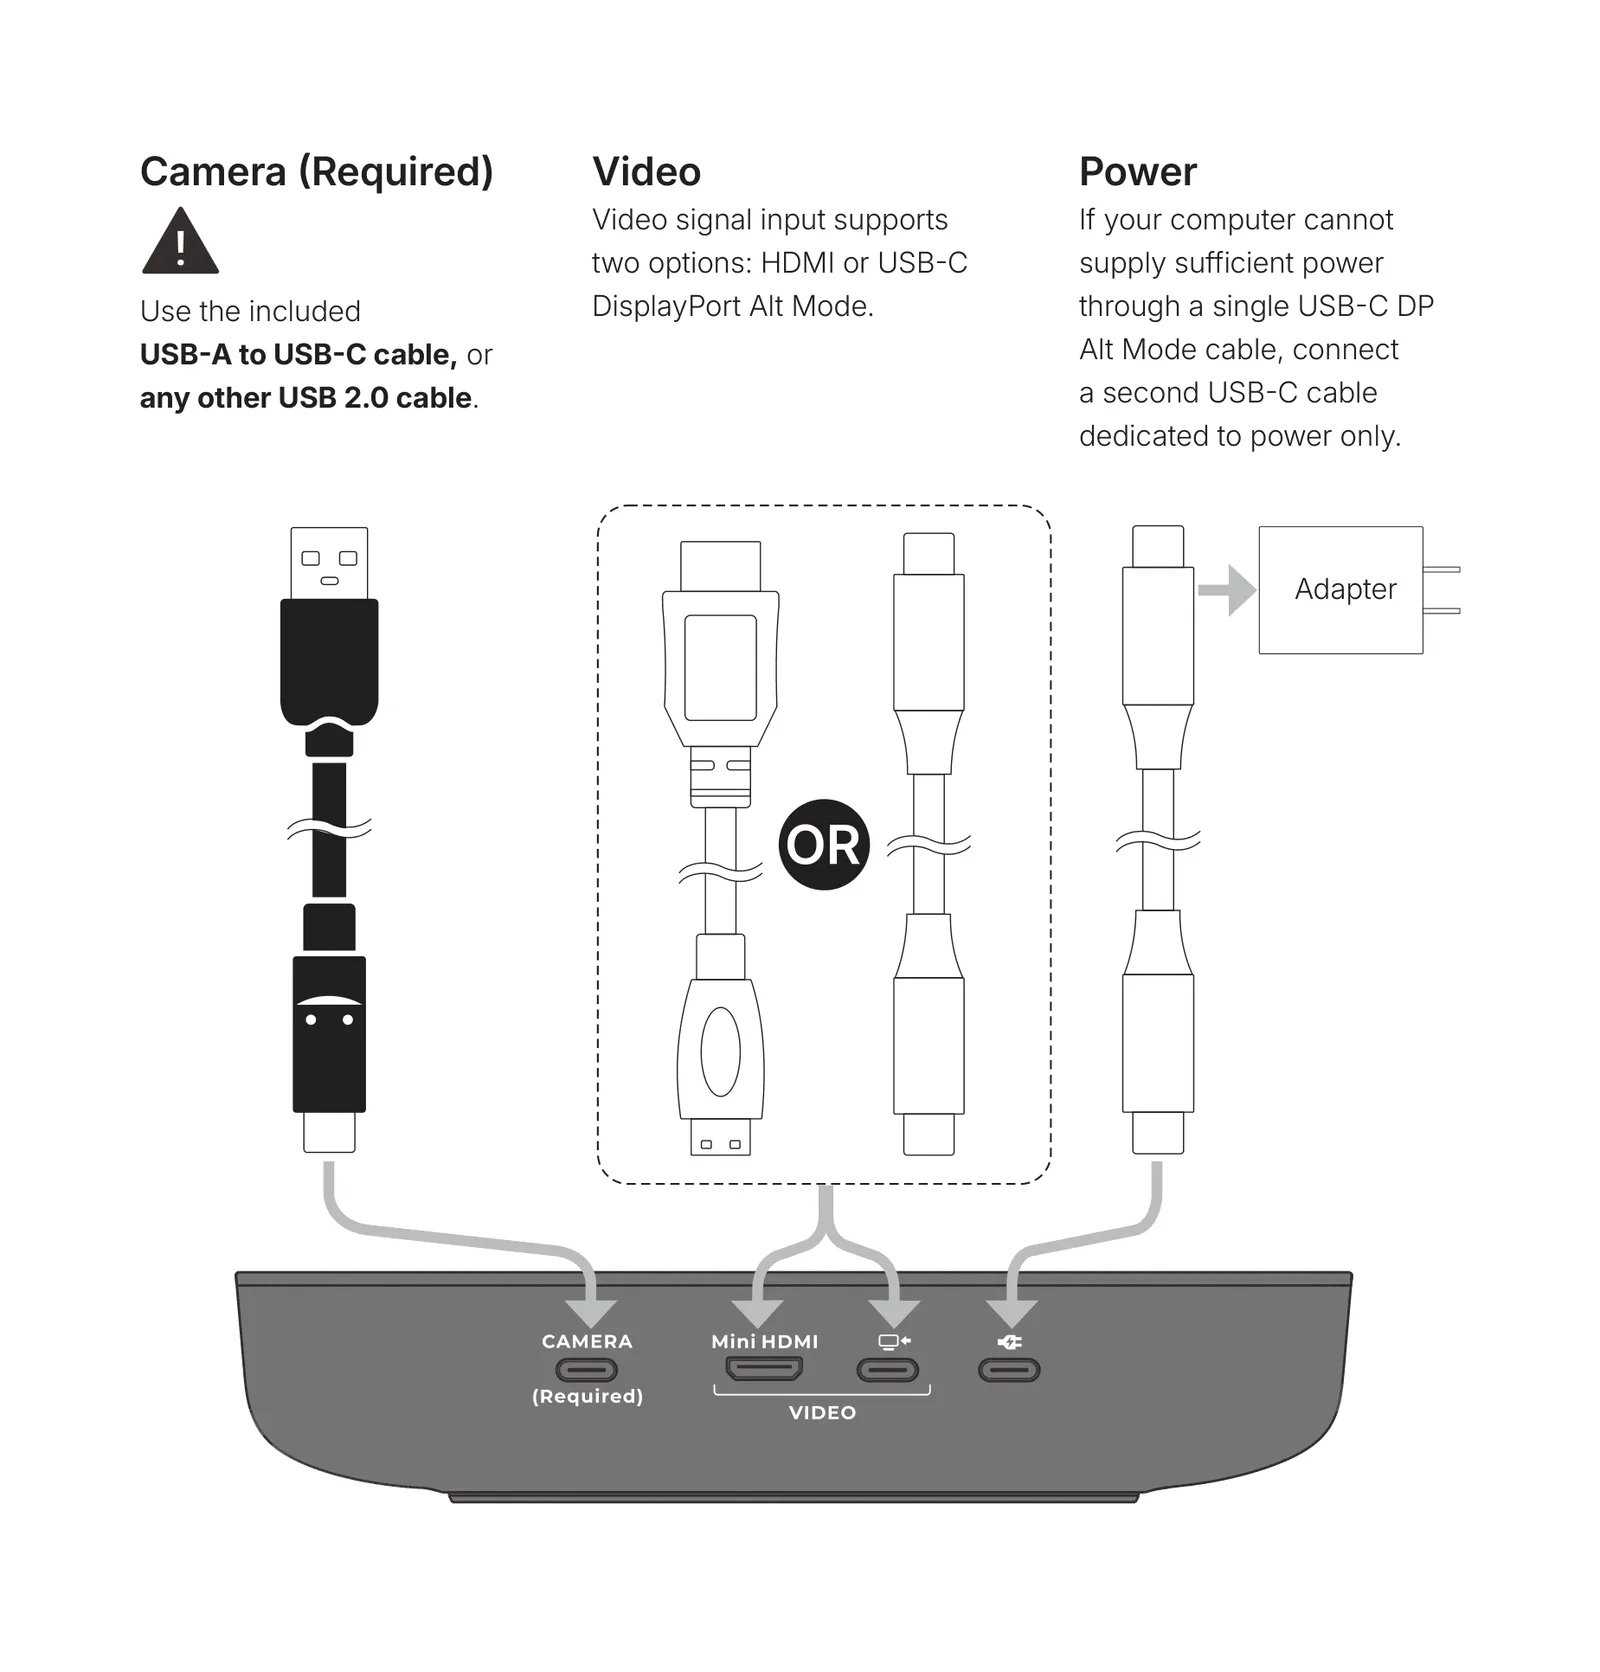
📝 NOTE — Some laptops can transmit video and provide power simultaneously through a single USB-C DisplayPort Alt Mode cable. The Owl3D Shift powers on automatically when a power source is connected. If the PC is powered off, the display enters standby mode. When the PC is powered on, the display wakes automatically and shows the desktop.
5. See it in 3D
5.1 Power on and off
The Owl3D Shift Software is required for real-time 3D conversion. Without it, the display operates as a standard 4K monitor.
Powering On : Connect the power source and ensure your PC is on. The Owl3D Shift powers on automatically and displays the desktop.
Entering Standby : When the PC powers off, sleeps, or loses video signal, the display enters standby automatically and the screen goes dark.
Waking from Standby : Power on or wake your PC. The display detects the signal and returns to normal operation automatically.
📝 NOTE — If the display does not power on after connecting all cables, verify that the power source is active and the PC is on. See the Troubleshooting section for additional guidance.
5.2 Get the software
System Requirements:
- Operating System: Windows 10 / 11 (64-bit)
- GPU: Dedicated NVIDIA graphics card (required for 3D)
- RAM: 8 GB or more recommended
- Storage: 2 GB available disk space
- Internet connection required for initial activation
Visit www.owl3d.com/shift on your PC to download the latest Owl3D software.
Launch Owl3D software. Follow the prompts to activate 3D.
📝 NOTE — System Requirements: Windows 10 / 11 (64-bit). A dedicated NVIDIA GPU is required. The Owl3D Shift software must remain running in the background while using 3D mode. Its icon appears in the Windows system tray when active. For the latest requirements, visit owl3d.ai/shift.
5.3 Turn on the 3D
With the software running and the display connected, you are ready to experience glasses-free 3D.
- Enable 3D Mode — In the Owl3D Shift application, toggle the "Enable 3D" switch to ON. The eye-tracking camera will calibrate to your position.
- Find Your Position — Sit 50-70 cm in front of the display, approximately at eye level with the screen center. The eye-tracking system adapts dynamically as you move.
- Enjoy — Drag the content window to the Owl3D Shift — websites, YouTube, Netflix, photos, games — is now rendered in real-time 3D depth. No glasses required.
📝 NOTE — For the best experience, stay within the 50-70 cm viewing zone and keep the display at approximately eye level. See the full User Manual at owl3d.ai/shift for software features and advanced settings.
5.4 What you can do
| Windows Nvidia RTX 30 and above | Windows Nvidia GTX 1650 or Radeon RX 570 and above | macOS M1 and above | |
|---|---|---|---|
| Live PC Screen to 3D | ✔ | ✖ | ✔ (Updates come in Q3 2026 for macOS M1 Pro and above) |
| Holographic Photo Viewer | ✔ | ✖ | ✔ |
| Holographic 3D Model Viewer | ✔ | ✔ | ✔ |
| Native 3D files (SBS, MVC) | ✔ | ✔ | ✔ |
📝 NOTE — For detailed software instructions and the latest updates, visit www.owl3d.com/shift.
6. Specifications
| Specification | Details |
|---|---|
| Display Size | 14 inches (diagonal) |
| Display Type | 4K LTPS LCD with Cylindrical Lenticular Lens Array |
| Resolution | 3840 × 2160 (4K UHD) |
| Pixel Density | 315 PPI |
| Peak Brightness | 600 nits |
| Contrast Ratio | 1500:1 |
| Color Gamut | 100% sRGB / 99% Adobe RGB |
| 3D Technology | Glasses-Free Lenticular Lens Array + Real-Time Eye Tracking |
| 3D Viewing Distance | 50 cm – 70 cm |
| 3D Angular Clarity | ~66 PPD |
| Eye Tracking | Integrated USB camera (real-time, continuous) |
| Video Inputs | USB-C (DisplayPort Alt Mode), Mini HDMI |
| Power Input | USB-C (20 W minimum) |
| Camera Port | USB-C (data, for eye-tracking camera) |
| VESA Mounting | VESA 75 × 75 mm |
| Operating Temp | 0°C – 40°C (32°F – 104°F) |
| Storage Temp | -20°C – 60°C (-4°F – 140°F) |
| Humidity | 20–80% RH (non-condensing) |
| Required OS | Windows 10 / 11 (64-bit) / Mac OS |
| Required GPU | Dedicated NVIDIA discrete graphics card |
7. Something not right?
If you experience issues, the following may help. If the problem persists, contact Owl3D support at support@owl3d.ai.
| Problem | Possible Solution |
|---|---|
| Display does not power on | Verify power cable is securely connected. If using USB-C from PC, confirm the port supports ≥20 W. Try the included USB-C Adapter. |
| No image on screen | Confirm the video signal cable (USB-C DP or Mini HDMI) is securely connected at both ends. Ensure the PC is on. Check PC display settings to confirm the Owl3D Shift is recognized as an external monitor. |
| 3D effect is not working | Ensure the Owl3D Shift software is installed and running, and "Enable 3D" is toggled ON. Confirm the Camera cable is connected and the camera is recognized by the software. Verify GPU meets system requirements. |
| 3D image is misaligned or blurry | Adjust seating to 50–70 cm from the display, at approximately eye level. Reduce bright light sources behind you. Use the Depth Adjustment controls in the software. |
| Eye tracking not detecting eyes | Ensure the Camera cable is connected. Clean the camera lens gently with a soft, dry cloth. Reduce strong backlighting. Confirm your face is within the camera's field of view. |
| Screen flickers or goes blank | Check all cable connections are secure. Confirm USB-C power source meets 20 W. Switch to the included USB-C Adapter if the issue persists. |
| Software installation fails | Confirm PC meets minimum system requirements. Temporarily disable antivirus during installation. Ensure you have administrator privileges. Re-download the installer from owl3d.ai/shift. |
| VESA mount wobbles or display tilts unexpectedly | Confirm M4 screws are tightened to the mount manufacturer's specifications. Ensure the mount arm's weight rating is sufficient for the Owl3D Shift. Check that all mount joints are properly secured. The VESA hole depth is only 5 mm. Please use M4×6 mm short screws or the spacers included with your mount arm. |
8. Keeping it clean
8.1 General precautions
- Do not attempt to repair the display yourself. Internal servicing must be performed by qualified service personnel.
- Unplug the display before cleaning.
- Avoid touching the screen directly. Skin oils may permanently damage the anti-reflective coating.
- Do not use in areas subject to excessive vibration or mechanical shock.
8.2 Clean the screen
The display panel and lenticular lens array require careful cleaning to preserve the optical coating.
- Power off and unplug before cleaning.
- Use a clean, soft, lint-free microfiber cloth to gently wipe the screen.
- For stubborn marks, lightly dampen the cloth with distilled water. Do not apply water directly to the screen.
- Wipe gently in a single direction. Do not rub in circular motions.
⚠️ WARNING — Do NOT use alcohol, benzene, ammonia-based cleaners, abrasive cloths, tissues, or commercial screen sprays. These will permanently damage the anti-reflective coating and lenticular lens array.
8.3 Clean the enclosure
- Wipe with a soft, slightly damp cloth.
- Do not allow liquid to enter ventilation openings.
- Do not use chemical solvents or abrasive cleaners on the enclosure.
9. Regulatory and service information
9.1 FCC Compliance Statement
This device complies with Part 15 of the FCC Rules. Operation is subject to the following two conditions: (1) this device may not cause harmful interference, and (2) this device must accept any interference received, including interference that may cause undesired operation.
📝 NOTE — Changes or modifications not approved by Owl3D, Inc. may void the user's authority to operate this equipment.
9.2 Declaration of RoHS2 Compliance
This product has been designed and manufactured in compliance with Directive 2011/65/EU (RoHS2) and is deemed to comply with the maximum concentration values issued by the European Technical Adaptation Committee (TAC).
9.3 Copyright Information
Copyright © 2025 Owl3D, Inc. All rights reserved. The Owl3D® name and logo are registered trademarks of Owl3D, Inc. All other trademarks are the property of their respective owners. Specifications are subject to change without notice.
9.4 Customer Service
For technical support, warranty information, and product registration, contact :
© 2026 Owl3D, Inc. All rights reserved. | owl3d.com